Showing posts with label Ubuntu. Show all posts

Thursday, July 17, 2014

Drush autocomplete in bash shell

View updated version of this blog here.

For shell users like me, Drush autocomplete is a bliss. This blog will tell you how you can autocomplete Drush commands in bash shell. The commands provided here will work for Ubuntu systems, I am not sure whether they will work for other systems as I do not know where Drush is installed for other systems.

  1. Install Drush in your system. If it is already installed, skip to step 2. Otherwise, you can install it from here
  2. Drush already provides you with bash aliases and autocompletion scripts. We just need to place them in right place.
  3. Execute cat /usr/share/php/drush/examples/example.bashrc >> ~/.bashrc This will append required bash aliases to your current bash settings.
  4. Execute sudo ln -s /usr/share/php/drush/drush.complete.sh /etc/bash_completion.d/ This shell script does the smart autocompletion, and here we link the source with existing bash settings. The script does the smart autcomplete job like, suggesting modules to be enabled/disabled.
  5. All settings are done. Just restart the shell ("exit" the current shell and open a new shell) and you are good to go.
List of bash aliases that you will get:
# Aliases for common drush commands that work in a global context.
alias dr='drush'
alias ddd='drush drupal-directory'
alias dl='drush pm-download'
alias ev='drush php-eval'
alias sa='drush site-alias'
alias lsa='drush site-alias --local'
alias st='drush core-status'
alias use='drush site-set'

# Aliases for drush commands that work on the current drupal site
alias cc='drush cache-clear'
alias cca='drush cache-clear all'
alias dis='drush pm-disable'
alias en='drush pm-enable'
alias pmi='drush pm-info'
alias pml='drush pm-list'
alias rf='drush pm-refresh'
alias unin='drush pm-uninstall'
alias up='drush pm-update'
alias upc='drush pm-updatecode'
alias updb='drush updatedb'
alias q='drush sql-query'

You can write "drush en" and then double press "tab" key for suggestions, you will see list of modules.

Update:
The location of drush.complete.sh may vary according to how you install drush. To find where the script resides, execute sudo find / -name "drush.complete.sh". Suppose the location is /home/subhojit/.composer/vendor/drush/drush/drush.complete.sh, you then execute the command sudo ln -s /home/subhojit/.composer/vendor/drush/drush/drush.complete.sh /etc/bash_completion.d/

Friday, March 15, 2013

How to use vim for Drupal development

View updated version of this blog here.

I am a Linux user, and a drupal developer too. Its been months I am using vim for writing custom drupal modules. Before it was eclipse, eclipse was good but I was having issues because of two reasons. First, I was working on a big project with lots of custom modules and huge database. Loading a module in eclipse editor took several minutes and secondly, my computer is a bit old Intel Core 2 Duo processor and 2GB RAM and . I have always heard being vim as one of the most powerful editors, but I realized it that time when I switched to vim for writing or just reading the code of custom modules.

Like everyone I googled for the vim support for drupal. The web pages that helped me most are these:
Non Linux users can also download and use vim, especially Windows users.

One of the recommended way to install required vim plugins for drupal development is to install them using drush. I had also installed vim plugins in this way. After installing drush, check drush version. Command to check drush version:

drush --version

If drush version is 5.8 then it is okay. Otherwise you need to upgrade drush.

After updating drush, install required vim plugins using the following commands:

drush @none dl vimrc
drush help vimrc-install
drush -v vimrc-install <options>

The first command will dowload the vimrc project. The second commad will show you the options for installing vim plugins.

But I installed it without using any options. I just did this:

drush -v vimrc-install

This will install certain vim plugins that will turn your simple vim to cooool vim. Absolutely ready for writing custom module. But you also need to configure certain vim settings so as to make it more developer friendly. I am providing my vim settings. Beginners can copy the settings, advanced users who knows tweaks and tricks of vim settings can make changes as they desire.


These are default vim settings that are loaded when you open vim. Vim global settings can be done from /usr/share/vim/vimrc while vim local settings can be done from ~/.vimrc. Vim global settings means that the vim settings will be available to all users of your system, while vim local settings are available for the particular logged in user. The file path I have given above are for Ubuntu, so Ubuntu users no worries. Sorry, for non Ubuntu Linux users you have to find it yourself.

Also it is recommended that you set color for your terminal. This will make the code more color distinguishable and easy to understand. Just edit ~/.bashrc and add the following line at the end:

export TERM="xterm-256color"

And do not forget to restart terminal after you have done this.

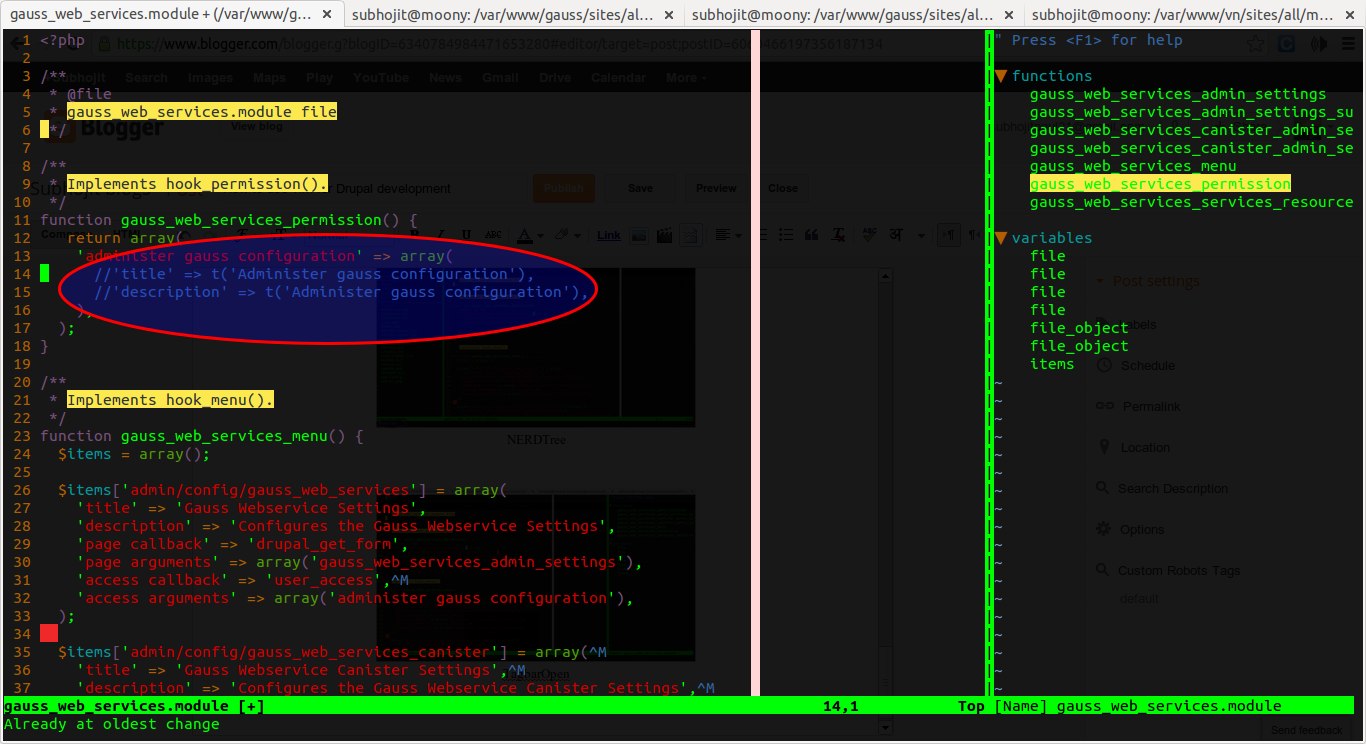
Now I am going to show you some amazing vim commands (available from plugins you installed earlier of course) that will seriously change your experience of custom module work in Drupal.

NERDTree
NERDTree

TagbarOpen
TagbarOpen

NERDCommeter
Command: NUMBER-OF-LINES/ci

NERDCommenter
Command: NUMBER-OF-LINES/ci

Frequently used shotcuts:
daw - Delete word under cursor
caw - Delete word under cursor and go to insert mode
d$ - Delete from under the cursor till end of line
c$ - Delete from under the cursor till end of line and go to insert mode
START-LINE-NUMBER,END-LINE-NUMBER"+y - Copy lines to system clipboard
gg"+yG - Copy all file content to system clipboard
CtrlXO - Autocomplete

Frequently used commands:
%s/TEXT-TO-SEARCH/TEXT-TO-REPLACE/gc - Interactive find and replace

View documentation of a Drupal function:
Bring the cursor at the start or under the function whose documentation you want to see. Then do:
<Leader>da - To view the documenation in drupal.org OR
<Leader>dc - To view the documentattion in drupalcontrib.org
The most wonderful thing I like about this is, it will automatically identify the core version from the module's info file. Suppose you are working on a 6.x core version module then it will show the documenation of the 6.x version. Cooollll, Right?

More information:
Drupal vimrc installs the following plugins:
pathogen - This plugin helps to manage your other vim plugins
nerdcommenter - This plugins helps you to comment out line of codes
nerdtree - This plugin acts like file explorer in eclipse where you can easily navigate through files in current directory
snipmate - This plugin provides code snippets. Drupal vimrc later adds its own module snippets in it
syntastic - This plugin provides syntax checking. Before writing to any file it will check syntax. Do not write and quit at the same time otherwise it will not be able to show errors, if any
tagbar - This plugin displays a list of functions and variables declared in the file
fugitive - Git wrapper

Other than this I installed another plugin:
SearchParty - This plugin provides color highlighting during text search
colorschemes -  A set of vim colorscheme

Update:
See a collection of vim plugins and settings for Drupal development in Use Vim as IDE for Drupal development, also see them in action.

Monday, September 24, 2012

Unable to send e-mail. Contact the site administrator if the problem persists.

View updated version of this blog here.

Drupal newbies trying to send mails from the Drupal contact form or using drupal_mail(), usually gets this error message “Unable to send e-mail. Contact the site administrator if the problem persists.”. This is because your system is not configured to send emails.

drupal_mail() calls the PHP mail() function to send emails, hence this article can also be useful to those PHP programmers who do not use Drupal as CMS.

To send e-mail, you need to install and configure postfix in your Ubuntu machine.

What is postfix?
Postfix is the default Mail Transfer Agent (MTA) in Ubuntu. It attempts to be fast and easy to administer and secure. It is compatible with the MTA sendmail.
For further reading see this page

To install postfix enter the following codes:

sudo apt-get install php-pear
sudo pear install mail
sudo pear install Net_SMTP
sudo pear install Auth_SASL
sudo pear install mail_mime
sudo apt-get install postfix

This will install required packages and postfix in you Ubuntu machine.
For users who have postfix already installed in their system will get a  message that "postfix is already installed".

Configure postfix using the following command:

sudo dpkg-reconfigure postfix

After you enter the command you will be asked certain questions. Most of the answers will be their default answers, but since you may be new to networking I have also specified the answers with their explanations.

  • The first question will ask you to enter mail server configuration type. The options with their details are listed there. Choose “Internet Site” option since you would like to send and recieve mails using SMTP.

  • The next question asks you to specify mail name. The default will be the username. Do not change it and move to the next question.


  • Next question asks you to enter the name by which you will recieve mails. The details are listed there. You will want that mails sent to you are saved in /var/mail/<your-username>, so do not change the default answer i.e. your username.


  • The next question asks you to enter the IP address from where you can accept mails. The defaults will be your username and localhost. Since, you will sending mails from you localhost Drupal site so do not change default answer and move to the next question.

  • In the next question choose the default answer “no”.

  • In the next question you are asked to enter the IP addresses which you want to block. Default answer are your localhost IP address i.e 127.0.0.1. So, you have to clear this field.

  • Select the default answer 0 in mailbox size limit.

  • Select the default answer in next question and do not make any changes in the field.

  • Select “all” in next question.


Postfix in your Ubuntu machine is now configured and now you can send mail from Drupal's contact form or using drupal_mail().